Thursday, 27 November 2014

Pre-Production work 4

Carrying on from last weeks blog,I have decided upon the 6 types that I would like to aim to create throughout the his project, as I stated I would in the last entry. It will be three types each for each theme, and are as follows:

Military:
.Main Battle Tank
. Missile Launcher
. Communications Satellite

Construction:
. Excavator
. Digger
. Wrecking Ball

With this decided it make it easier for me to select what parts I will have to model for my robot mechs, as well as to tailor the designs to each areas specific needs.

Carrying on from this decision, I continued pre-production work by testing out different colour schemes, one set for a military based robot mech, and the other for one based around a construction theme.

The process to do this was pretty simple. I tank one of the designs from both themes into their own pages, grabbed one of the references images and color picked from those. I used layers to make it easier to get all the colours in without fussing around too much.  Below is an example of the work in progress.

Example of WIP: Pick the colour scheme from the reference, use the main colour as the base layer, put the picked colours to grab for adjustments, build it up into the necessary pattern.  

And here we have the finished colour schemes for each.

Tank Colour Schemes

Construction Colour Schemes

I really like the more detailed patterns for the tank's colour schemes, such as the digital and mud pattern camos. Their was a great variety to choose from, and I felt I chose the best ones that appealed to my idea out of my reference images.

For construction the colours were a little more basic, with construction vehicles generally having block colours to be easily seen and distinguished. I personally like the red colour scheme the best, so its the one i'll most likely be going with this one.

Alongside this I also started work on a company logo for my robot mechs to be a part of. Since I want to make this project as realistic as I can, a company that actually makes these machines fits the bill the best.

For the name I wanted to go for animal with connotations of a tough, reliable and anatomically strong to connote the robots own strengths. For this purpose I decided to go with a rhino, and started to create a few logo designs. I also found am referencing actually companies using a rhino as their logo, as well as an image of a rhino itself.

Current work is focusing on the silhouette of the rhino logo. 

This is still a work in progress and will be updated upon as the project goes on.

So having looked into the colour schemes and the prospect of a logo for my work, I've decide to move towards the more technical aspect of my concept art: working out the inner workings for my robot mechs designs.

So far I've done work into the robot arms that will come as a standard part for both the military and construction themes.

The red areas show the moveable parts of the arm. The green highligh areas that i've done for two of the arms shows the armour that would cover them. I also worked on various finger shapes, as hands in general aren't my strongest point. I feel a little more confident having practiced these different designs. Also as you can see the highlighted arms show you the design that i'm most happiest with and will go on to develop for the final designs.

In addition this I have also been practiced modelling general robotic and mechanical parts which I fell will come in handy when it comes to modelling the robot mechs in the later stages. Below are a few screenshots of parts I've been working on to help with my ideas.

I've looked at things such as tank wheels, construction digger lights, and creating a simple metal panel.

I also modeled different shaped screws, bolts and nuts, and found a useful tutorial in order to get the correct shape. 

I've looked at robots from one of my artists Keith Thompson, and have practiced modelling its structure for Armour creation practice. 

And i've looked at real life reference for modelling as well. I started modeled an abrams tank using a  schematic I found online. This has been useful for working out shapes from real life reference. 

And finally, i've also done research into useful artist references that I aim using to help my art work. My main reference is Keith Thompson, a fantastic robot artists amongst other things, who has his own book on how to concept a robot, taking into consideration things such as backstory, materials and mechanical components.

I've also found a few other handy artists that can help me with my work, or whose general style could help influence my own work. Below are some image examples and website links to show you what im using, and to give you the opportunity to look at them yourself.

http://www.keiththompsonart.com/robots.html


http://www.emersontung.com/


http://www.artofben.com/Robotics-Weapons


With these artists I feel that'll really help with my concept creation of my own robot mechs, as well as give me an understanding as to how much detail I want to put into them.

For the next entry I will continue to focus on working out the inner workings for the robot mechs, as well as head towards the final designs that I will use for my project.

Sunday, 23 November 2014

Pre Production Work 3

In this entry I will be showing the further research and development of concept art that has been done for the robot mech designs.

To start with I continued to research areas that will act as good reference for my designs, and add to my overall image database. I've looked at mechs in TV, specifically in anime for the time being, as there are thousands of designs to look at. For real life I've added the Vehicles section to the image database, and have started to look at construction and military machines, as these will be a key vocal point for concept art work.

Here are the links for websites where I found my images if you wish to look further into the subject areas:

http://gundam.wikia.com/wiki/The_Gundam_Wiki - Anime mechs
http://www.military-today.com/tanks.htm - Military vehicles
http://www.machinefinder.com/ww/en-US/machine/3411459- Site that sells construction vehicles and has lots of useful images
http://www.trucks-cranes.nl/english/cranes/demag.html - site with image of trucks and cranes

Mechs from Anime, which has a rich variety to use as reference.

Vehicles from Military, which has helped with my mech deisgns.

Vehicles from Construction, which looks at machines such as excavators, diggers and compactors. 

With this to help back up my designs, I also quickly put together a moodboard looking at the different areas of the robot's design that I will need to consider in order to make it as realistic as possible. I feel that with this as a constant reminder I won't stray off into creating overly crazy or non-functional designs for my concepts.


This moodboard shows you the different references and areas that I am considering for my overall art work. 

With this done I've gone on to create two lots of concepts based off the final four robot blockout chosen from the last post entry. Here's a reminder if you haven't looked at them already.


Final 4 robots

I made heavy use of reference from my real life military and construction machine research. I've looked at and referenced their shapes, components and size considerations in order to try and add to the realism of my designs. They particularly came in handy when it came to parts such as lights, caterpillar tracks and armour plating styles.


First lot of concepts

Second lot of concepts

Also through my research I've had to take into consideration what roles each mech would perform. With the different customisable parts I will have to make sure that the basic components can be changed easily. To this end, based of research and consideration moodboard, I've listed and looked at the parts that I have placed into my design for the first batch of robot mechs.

Concepts with notes

At this point I aim to whittle down the selection from 11 designs. Additionally I will create list of 3 job roles in both the Military and Construction industries that I will focus my main design on, which will help to decide on a final look and what changeable parts I will have to create.

So next weeks post will focus further on pre-production work for these designs.

Pre-Production Work 2

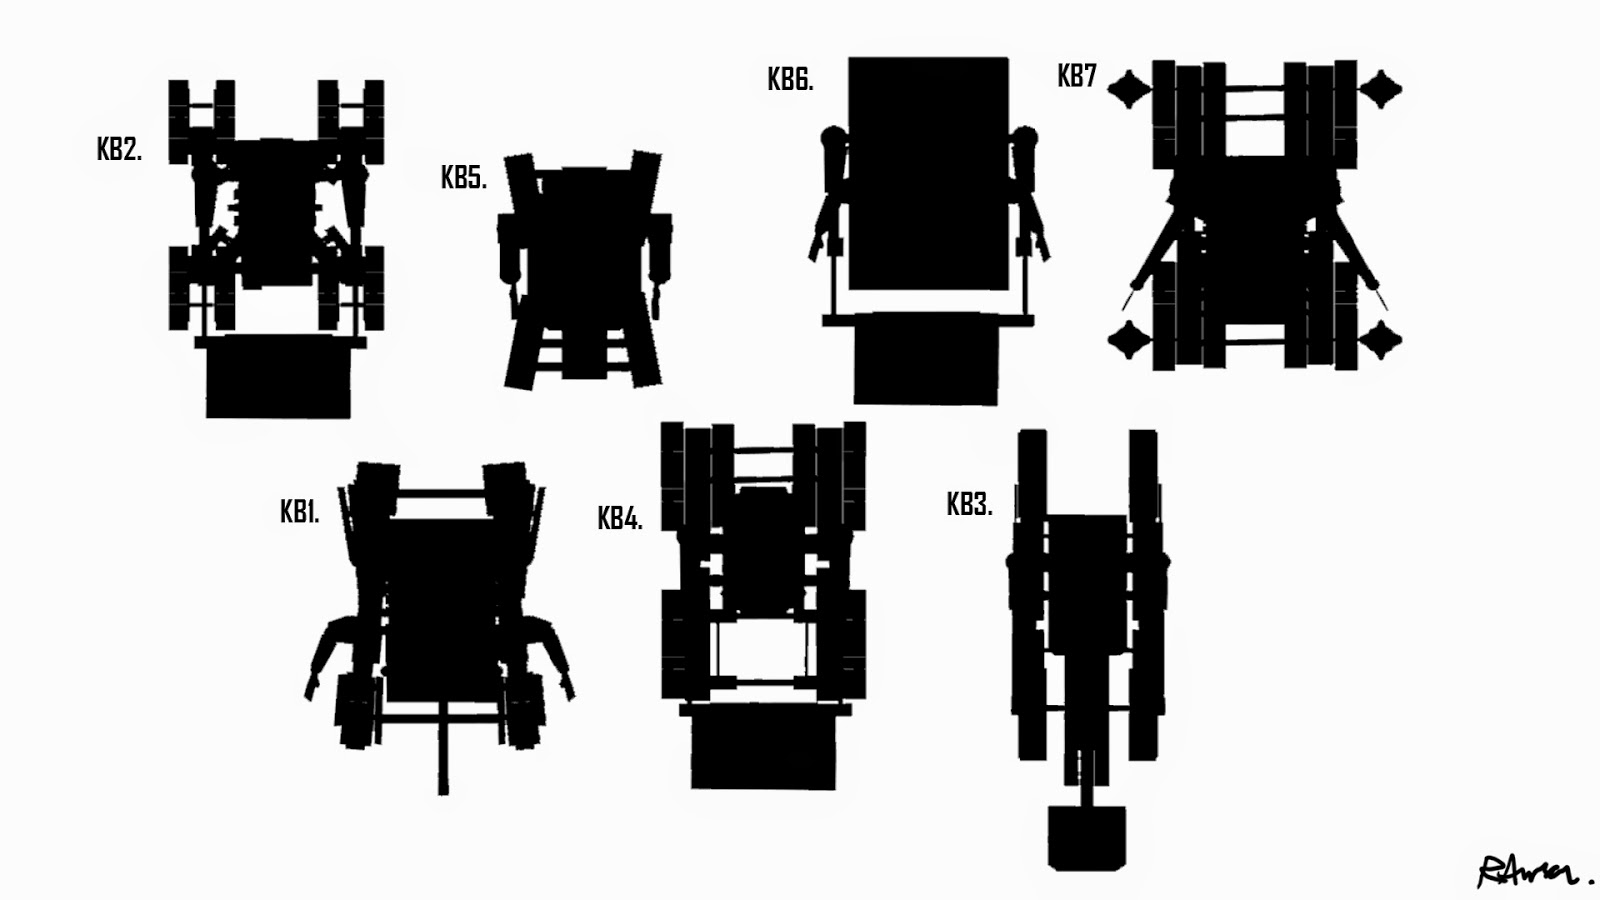
Carrying on from the last post I have since created several more blockout models in 3DS MAX based on my concept thumbnails, not worrying about correct topology and just getting the general shapes in. However in addition to this I also started to 'kitbash' models together, which is where I took parts from different models and put them together. Additionally I created new pieces for the kitbash models to to work with, in order to create more interesting designs and overall more variety as well. There are a total of 7 kitbashed robots, which will be marked out by KB.

Left to right: Mech 23, 26, 27 and 34

Left to right: Mech 20, 25, KB1 and KB 2

Left to right: Mech  KB2, KB 3, KB 4 and KB5

Left to right: Mech KB 6 and KB 7
I found that the further I kitbashed the more interesting the shapes and designs of these robots became. I constructed designs based around tanks, diggers and excavators, which additionally made me think about how they would fit on to my designs, giving me the slight realistic aspect at this stage of development. Once each model was finished, I used the group function in 3DS MAX to make it easier to move all the pieces around at once.

I also decided to create silhouette models within 3DS MAX in order to see if their shapes worked as well as their design. To do this, I turned the shader scheme onto 'consistent colours', duplicated the finished robots and made them black. I then placed two white image planes in the scene for a clear background. From here I simply captured still images, put them into Photoshop and placed them with groups. I took both side and top views so that I would be able to analyze their shapes from more than just one angle. Note the numbers represent either their thumbnail placement or which kitbashed robot they are.


From doing this I found a lot of them had a strong side profile, however when it came to the top view models that had components such as tank bases, they looked a lot weaker, so I decided that they wouldn't be considered strongly for the final designs. Also the two legged robots from a previous post wouldn't work in a realistic sense, so I've chosen to ignore them as well.

My aim now was to minimize the number of robots that I would use to continue my development work. I found it a little difficult to choose at first, so instead decided to ask a few people round the labs which ones they would choose, and eventually got a voting system going wherein I would show them all of my designs, and they would pic their favourite four, so that whilst reducing the number of robots, still giving me a fair amount to work with. I voted as well so that I could compare my favorites to everyone else's.

This also helped as it gave me a perspective on what other people though were cool robots, as well as ones that they believed to be functional for my project idea.

The results of this and the people who took part are listed below (Note in the survey the robots are listed from 1 to 14 and not by their respected thumbnail or kitbashed numbers)

People who took Part:
Robert Anson, Caitie Graham, Will Ahmadi, Luke Dawson, Stephen Reeson, Mike Taylor, Jamie Reynolds, Joel Holgarth

Results:
.1 0 votes
.2 1 vote
.3 3 votes
.4 5 votes
.5 2 votes
.6 3 votes
.7 0 votes
.8 7 votes
.9 3 votes
.10 2 votes
.11 2 votes
.12 0 votes
.13 2 votes
.14 4 votes

So as you can see some robots were completely ignored, some were agreed on, and others were liked really well. So based of the votes cast, and my on decisions on some of the tied ones, I decided upon the final robots to use for further developmental work, as you can see below.

The final four: Top Left Mech 26. Top Right Mech 27. Bottom Left Mech KB1. And Bottom Right Mech KB 7


So with these basic blockouts out of the way, the next post will deal with further concept art and research done for the robot mechs.

Sunday, 16 November 2014

Areas of Research

In this post i'll show you the research that I have done so far and am going to continue to do throughout the project. I find that doing all the research at the beginning and then leaving it would be pointless, as you'll always look up new links and videos for help in certain areas your work. But for now this'll give you an idea of how and where I started.

First thing to do was to decide what reference I could research, with the obvious choice being robots and mechs in games. However I expanded this to general robotics, as I feel this will give me a bigger field of scope for my current project and for future works.

I quickly made lists on the online software Evernote, where I store a lot of my useful links, info and notes that I find from around the web. Heres one example of robotics found in games. I aim to do this with other areas as well:


So from this I decided to start off with robots and mechs found in games, but also in real life. At the basic level of research I wanted to look at images and appearances in real life and media, compiling a visual library of them until eventually I could draw out the images not needed and bring a focused group of them together. For the current project, where im looking at robotics in 4 main areas currently: Animal Based Robots, Human Enhancements, Mechs and Robots. From there I further split each category into films, games, real life and TV. Examples of these are shown below.

Robots from Games, which has a rich variety of designs and shapes.

Mechs from Games, again although not as many as robots, still quite a few to choose from.

Mechs From Real life, which have far less to choose from, showing how difficult they are to create.

Robots from films, again another area with lots to choose from.

Animal based robots from games, a fair few to select from, but they provided a few interesting shapes to the palette.
So far from just this selection I have gained a fair bit of insight into the world of robots, all areas showing casing different levels of design and function. This image database is far from finished, as their are still areas that need to be explored, titles I may of missed, and areas of research I haven't added in yet (Such as toys and art from the internet.) But as well as helping me with this project, it will be a fantastic resource to explore in future use.

For general research I decided to start off with realistic robots as they will be key to my own designs. To this end I looked up robotics companies, and found a great selection of up to date modern ones to choose from. Below are a couple of examples of this.
The Japanese Company Suidobashi Heavy Industries, showcasing their recent creation Kuratas in 2012. This robot was built purely for the fun of making it, and is heavily inspired by robot based Anime shows. 

Boston Dynamics, founded in 1992 Waltham Massachusetts, America. One of the largest leading robotics companies in the world, they have produced robots such as LS3, Atlas and Petman. They take inspiration from both the human and animal form.
These websites have given me a good insight into the various types of robots out there, how they were made and what they can do. It also shows that they are built for purpose, staying true to form and function, rather than robots found in video games, which are made to look cool and fantastical.

I've also read into gaming articles and found websites that give me the basic info that I need for my work. Since my FYP project interlinks with my Contemporary studies paper 'How does Implementing mechanical components affect function and design for robots in games', I've been able to find a lot of good articles that can be used for both areas. Below are a few examples of this:

Gamasutra is a great website with articles on current work from industry professionals and companies, as well as info on the latest games and game tech. 


HowstuffWorks is a website that explains, well, how stuff works. In this article it talks about the robots today, what their made from, how they work, and what jobs they were created for.
Also game websites such as the website for Hawekn, an online mech FPS. These give me useful info on their designs and functions, how they can be customized, specs, and further ideas for my work.
Also through general research i've found some good websites that will help me with the artistic look I want to go for. One example is bulldozer vfx, a website that makes their robotic designs look incredibly realistic and detailed. I'll be making sure to use this one for my future work.

A general look at the websites work.
A mech creation, very handy for the work that I am doing. 
So far I feel that all of this research has been incredibly handy to my work. Its given me an insight into hundreds of designs, and has also forced me to consider real life science and design when thinking about how to go about making my own robot. Although I have yet to compiled some of this information properly, brief readings of it tell me that I'll be design and model robots with a greater understanding once this project is over.

For my last point, I tend to save most of my useful links and the odd gem on the Evernote software. In addition I have also started a library of  useful terms for my contempoary studies paper, which has come very handy in relating to my FYP work, as shown below:


So for now this post concludes the amount of research that I have done to date. Not all of it is on here, but as I stated at the beginning enough to give you a rough grounding in how i'm going about it. For any goo discovery's related to my artwork i'll be posting them in other posts as I go along. 

However, for the next blog entry I aim to show more pre-production work and further development of the robot's concept. 


Beginning of Pre-Production Work

Carrying on from the last post entry, this entry covers the beginnings of my pre-production work.

To start with I created a moodboard image that gives you a general idea of the kind of robot that I want to create.


As you can see i'm aiming for a chunky/blocky robot, as through finding these images the more realistic end of the robot spectrum in games reflect the real life blocky shapes of construction and military vehicles. Anything with rounded or smoothed shapes tend to be more fantastical and unrealistic, or are just not what i'm aiming for in the design.

 I want to make it pilotable by a human driver as well as an A.I., as I feel this will increase the customization aspect that i'm driving for in its design. Its also given an idea of what parts i'll need to consider and model, such as pistons, tank wheels, metal poles and more complex parts made up of multiple pieces such as an engine.

Additionally it gives you ideas of work pieces I want to try and develop during the art pipeline, such as a blue print sheet and a rendering system that shows a scanning of the inner parts.

After this the next step was to create lots of thumbnails!


I had fun doing the different variations on the design and shapes based off of research that I have look at alongside designing these thumbnails, from games such as Metal Gear Solid, Mechwarrior and Armoured Core. Although two legged isn't as realistic for a giant robot design I decided to explore it in order to gain ideas for further designs.

In particular I'm focusing on the four legged/wheeled designs, as they offer the best results for a realistic look.Tanks and construction vehicles such as diggers, extractors and the challenger II tank were particularly helpful for realistic reference.

So from these thumbnail designs I decided to create some basic 3D thumbnails to see how they would look within 3DS MAX.

Thumbnails 3, 1 and 7 in Max.

Thumbnails 11 and 17 in Max.

Thumbnails 19 and 22 in Max.

My reasoning for starting 3D models so soon is that I don't want to constrain my pre-production to just 2D. Modelling initial ideas in 3D allows me to see if their are any mistakes or if tweaking is needed in the design. For these models proper geometry and vert/edge placement at this point doesn't matter. Its mainly to give me an idea of the shapes, silhouette and how they could all be pieced together. Like this example shown below.


Whilst the bi-pedal robots have interesting designs, as I mentioned earlier  for the sake of realism and functionality i'm going to stick with the four legged/wheeled.tread look. However the torso work for the bi-pedal robots will still come in handy at the very least. 
For my next blog entry that includes pre-production work it will continue to focus on 3D Work and further conceptual work.

In the meantime the next blog entry will give you an idea of the research that I aim looking into alongside the artwork that I am producing.